How to Install Perforated Pool Fencing: A Step-by-Step Guide
Posted by Lee Benson on 17th Jan 2025
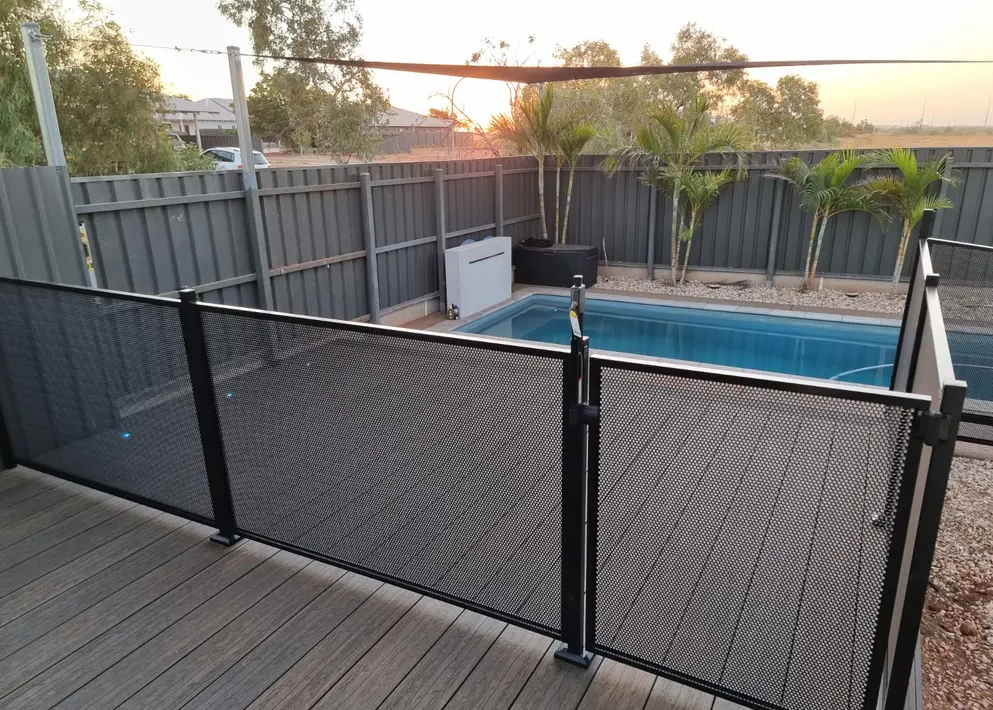
When it comes to pool safety, one of the most important features is a durable and secure pool fence. These days, modern pool fences have come a long way from the conventional metal poles that retract from the design of the outdoor space. Perforated pool fencing is quickly becoming a favourite amongst style and safety-conscious Aussie homeowners – providing the necessary security for your pool area while adding a modern touch to the outdoor space it lives within, adding to your functional landscaping.
If you've chosen one for yourself, you might be happy to know they’re possible to install on your own, which we’ll explain in this article. Or maybe you’re a fencing contractor working with perforated pool fencing for the first time. Either way, there are two main methods to choose from, and each method involves slightly different techniques, but both will result in a strong and secure installation. This is important for safety, as well as the value of your property when it comes time to sell. In this article, we’ll walk you through each method, providing detailed instructions to ensure your installation goes smoothly.
- Method 1: Installation with Brackets on Both Sides
- Method 2: Installation with U Channels on Both Sides
- The Benefits of Perforated Pool Fencing
- Available Designs & Textures
- Perfectly Pleasing Perforated Pool Fencing
Materials required as part of your perforated pool fencing:
- Perforated pool fencing panels
- Top and bottom rails and side rails (framing kit)
- Self-tapping wafer head screws
- Clip beads
- U channels (for Method 2)
- Posts
- Fixings for brackets
- Brackets
- Fence panel fittings
Additional tools you will need:
- Drill
- Measuring tape
- 3mm drill bit for pilot holes
- Level
Method 1: Installation with Brackets on Both Sides
This method is the go-to, first option, if you can use brackets to support your frame, and don’t need U channels for additional support. Here’s how you can install your perforated pool fencing using clip beads and fixed brackets:
- Drill drainage holes at the ends and middle of the bottom rail – start by drilling drainage holes at the ends and the middle of the bottom rail, towards the bottom of the rail. This prevents water from collecting at the base of the fence, which can lead to rusting over time.
- Position the panel in the frame – next, place the perforated panel into the frame, aligning it properly by butting up against the rail ribs.
- Check for equal overhang of the rail – measure both sides of the rail overhang (for both the top and bottom rail) to ensure it is equal on both sides. This will help maintain a symmetrical look and that the panel fits perfectly within the frame.
- Square the panel –to make sure the panel is perfectly square, measure the distance from corner to corner (top left to bottom right) and then compare it to the other corner to corner measurement. The measurements should match. If they don’t, adjust the panel until they do.
- Drill pilot holes into the frame –once everything is aligned, drill 3mm pilot holes into the frame through the existing holes in the perforated panel.
- Secure the panel – now, fix off the top and bottom outside holes first by inserting the screws through the panel and into the rails, then double-check that the panel is square before securing the remaining holes.
- Temporarily move side rails – move the side rails away from the panel temporarily to make the next steps easier.
- Attach clip beads – affix clip beads to the top and bottom rail, making sure they are snug and secure.
- Return the side rails to position after installing the clip beads
- Fix the panel to the side rails – attach the panel to the side rails using the self-tapping wafer head screws.
- Affix clip beads to the side rails – once the panel is attached, affix additional clip beads to the side rails.
- Install brackets on the post – fix the brackets to the post (top and bottom) using the suitable provided fixings – these brackets will hold the panel in place.
- Insert and pivot the panel into position – slide the loose brackets onto the opposite side of the top and bottom rails, then insert the rail into the fixed brackets. You can now pivot the panel into position.
- Secure the brackets – finally, secure the loose brackets onto the post using the fixings. In this last step, make sure everything is tightly fastened and stable.
Method 2: Installation with U Channels on Both Sides
For added security and a more stable installation, Method 2 involves using U channels on both sides of the panel. This method is particularly effective for ensuring the panels stay firmly in place and are aligned properly. Many of the steps are similar to method 1, but there are some unique steps involved in this method that must be followed. Here are the instructions for method 2:
- Drill drainage holes at the ends and middle of the bottom rail – start by drilling drainage holes at the ends and the middle of the bottom rail, towards the bottom of the rail. This prevents water from collecting at the base of the fence, which can lead to rusting over time.
- Position the panel in the frame – next, place the perforated panel into the frame, aligning it properly by butting up against the rail ribs.
- Square the panel –to make sure the panel is perfectly square, measure the distance from corner to corner (top left to bottom right) and then compare it to the other corner to corner measurement. The measurements should match. If they don’t, adjust the panel until they do.
- Drill pilot holes into the frame –once everything is aligned, drill 3mm pilot holes into the frame through the existing holes in the perforated panel.
- Secure the panel – now, fix off the top and bottom outside holes first by inserting the screws through the panel and into the rails, then double-check that the panel is square before securing the remaining holes.
- Temporarily move side rails – move the side rails away from the panel temporarily to make the next steps easier.
- Install clip beads to the top and bottom rails – the clip beads to the top and bottom rail as in Method 1.
- Return the side rails to position after installing the clip beads
- Fix the panel to the side rails – attach the panel to the side rails using the self-tapping wafer head screws.
- Affix clip beads to the side rails – once the panel is attached, affix additional clip beads to the side rails.
- Install U Channels on posts – (this is where Method 2 differs) install the U channels onto the posts by using self-tapping wafer head screws. The U channels will hold the panel in place on both sides.
- Insert the panel into U Channels – from the top, insert the panel into the U channels. Secure the panel using wafer head screws, starting from the bottom of the panel and working your way up.
The Benefits of Perforated Pool Fencing
While reading our hot to install perforated pool fencing guide above, before applying the instructions it might seem like a challenging task. But, it’s actually renowned for its easy installation, and our customers have confirmed they love it for easy installation. Perforated pool fencing is also low-maintenance, requiring only a simple hose down and an occasional scrub, particularly if you live in a coastal area.
In terms of practicality once installed, the perforated pool fence offers fantastic visibility. Given its perforations, you can see through every part of the panel, which makes it one of the safest fencing for kids. Finally, perforated pool fencing has visual appeal in spades with subtle and a dark shade that match any style preference.
Available Designs & Textures
Perforated pool fencing is available in various designs, allowing you to choose the best style for your home. At Outback Fencing, we stock the Palm Pattern and Premium Full Perf, so you can decide whether you want a more simplistic style or a tropical garden theme full of character. Both options require the same low-maintenance pool fence cleaning and hold similar high-durability features.
Palm Pattern
Our Palm Pattern perforated pool fence patterns feature a palm tree design created from differing densities in the perforations. It’s available in Matt Black or Monument Texture Powder Coat, and perfectly suits backyards with plants that vary in shapes, regions and sizes.
Premium Full Perf
The Premium Full Perf doesn’t have a pattern. Rather, the panel consists of uniform perforations, exuding elegance and simplicity. Full perforation panels are perfect for contemporary designs or eclectic backyards, where more character in the pool fence will only conflict with the rest of the space.
Perfectly Pleasing Perforated Pool Fencing
Installing your perforated pool fencing can be a rewarding DIY project once you have all the necessary supplies from us here at Outback Fencing along with your installation tools. Method 1 with clip beads and fixed brackets is best suited for spaces that allow for fixing brackets into the ground, and Method 2 utilises U channels for additional support when brackets aren’t appropriate. Whichever method you choose, both offer a solid, long-lasting installation that delivers a fence for permanent pool safety. Not to mention, you’ll end up with a freshly updated pool space with a beautiful fence that elevates all types of backyards.
By following the steps outlined in this guide, you can ensure a smooth, secure and professional finish. Always remember to double-check your measurements, maintain square alignment and secure all components tightly for the best results.
Want more information on how to install perforated pool fencing, or for advice on which fencing supplies to purchase for your pool fence? Contact the team at Outback Fencing today.